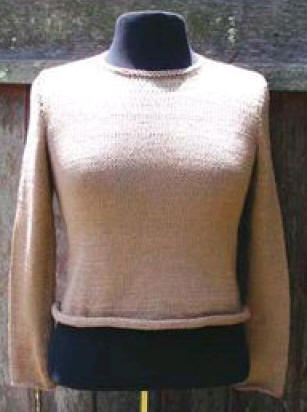
Basic Set-in Sleeve Sweater
Tricot / Knitting
For a closer fitting garment that conforms more to the shape of the body, here is a sweater with set in sleeves. The sleeves and body require more shaping and care in assembly, but the resulting sweater results in a closer fitting garment, with less bulk at the armholes.
This style is made with simple rolled edges, but you could easily begin with a ribbing along the lower edge and sleeves instead. The yarn can be a simple solid, or a self striping yarn, leaving you to enjoy knitting in stockinette stitch throughout the piece.
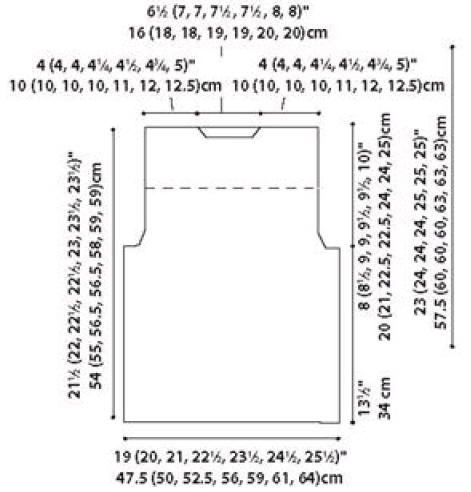
Sizes
To fit chest sizes 34 (36, 38, 40, 42, 44, 46)"
Knitted Measurements
Chest 38 (40, 42, 45, 47, 49, 51)"
Length 21.5 (22, 22.5, 22.5, 23, 23.5, 23.5)"
Upper Arm 12.5 (13, 13.5, 14, 14.5, 15, 15)"
Materials list
Six 4 oz. balls of worsted weight yarn

Size 7, 26" and 20" circular needles
Tapestry needle
Stitch markers
Gauge
In stockinette stitch 18 sts and 24 rows = 4"
Yarn used for samples shown
Basic Solid Colored Sweater:
Brown Sheep’s Cotton Fleece (80% cotton/20% merino wool, 3.5 oz., 215 yd.) six skeins in color CW-820 Teddy Bear.
Sampler Tunic: Louet Gems (100% merino wool, 1.5 oz., 175 yd.) 6 skeins in color Champagne.
Back
CO 84 (86, 90, 94, 100, 104, 108) sts.
Knit in St st until piece is 12 (12.5, 13, 13.5 14, 14.5, 15)" long from cast on (includes extra 1" for rolled edge).
Armhole Shaping:
BO 4 (4, 5, 6, 6, 6, 7) sts at beg of next 2 rows - 76 (78, 80, 82, 88, 92, 94) sts.
Dec 1 st every RS row 6 (6, 6, 6, 7, 7, 7) times - 64 (66, 68, 70, 74, 78, 80) sts.
Work even until armhole meas 7.5 (8, 8.5, 9, 9, 9.5, 9.5)".
Shape Neckline
On next right side row k 21 (21, 21, 21, 22, 23, 24) sts, transfer center 22 (24, 26, 28, 30, 32, 32) sts to st holder, attach new ball of yarn and k rem 21 (21, 21, 21, 22, 23, 24) sts.
Work ea side separately.
Dec 1 st at center on next 3 rows. At the same time, BO 6 (6, 6, 6, 7, 7, 8) sts at shoulder on next two rows that begin at the shoulder.
BO rem 6 (6, 6, 6, 8, 8, 8) sts.
Work 2 more rows even in St st.
BO.
Front
Work the same as for the back until piece meas 4" less than finished length.
Shape Neckline:
On next right side row, k24 (24, 24, 24, 25, 26, 27) sts, transfer center 16 (18, 20, 22, 24, 26, 26) sts to st holder, attach new ball of yarn and k rem 24 (24, 24, 24, 25, 26, 27) sts.
Work ea side separately.
Dec 1 st on neck edge on next 6 rows - 18 (18, 18, 18, 19, 20, 21) sts. Work 16 more rows even in St st.
BO 6 (6, 6, 6, 7, 7, 8) sts at shoulder on next 2 rows that begin at shoulder edge.
BO rem 6 (6, 6, 6, 8, 8, 8) sts.
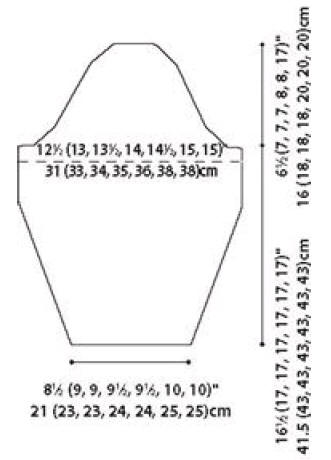
Sleeves (make two)
CO 40 (40, 42, 42, 44, 44, 46) sts.
Every 13th (12th, 12th, 11th, 10th, 9th, 9th) row inc 1 st ea side 7 (8, 8, 9, 10, 11, 11) times - 54 (56, 58, 60, 64, 66, 68) sts and 91 (96, 96, 99, 100, 99, 99) rows.
Work 3 (0, 2, 3, 2, 6, 6) more rows.
BO 4 (4, 5, 5, 6, 6, 6) sts at beg of next 2 rows - 46 (48, 48, 50, 52, 54, 56) sts.
Dec 1 st ea end every RS row 5 (6, 6, 7, 7, 7, 8) times, then every 3rd row 5 times, then every RS row 3 times.
BO rem 15 (15, 15, 15, 17, 19, 19) sts.
Assembly and Finishing
Block all pieces to size.
Sew the front to back at shoulders.
Collar
With the right side of knitting facing you, pick up and knit 3 sts from the right back neck edge, 22 (24, 26, 28, 30, 32, 32) sts from the back st holder, 3 sts from the left back neck edge, 21 sts from left front neck edge, 16 (18, 20, 22, 24, 26, 26) sts from the front st holder, and 21 sts from right front neck edge 86 (90, 94, 98, 102, 106, 106) sts.
Knitting in the round, k one round decreasing 3 sts evenly spaced along the back edge, and decrease 6 sts evenly spaced along the front edge. K one round without decreases. Reverse direction so you are working from the wrong side of the sweater and BO loosely. Steam block opening so it lies fl at.
Sleeves and Side seams:
Center the sleeves over the shoulder seams and sew to the sides of the front and back. Sew the sleeve and front and back side seams tog.
Progressive Color Yarn Variation
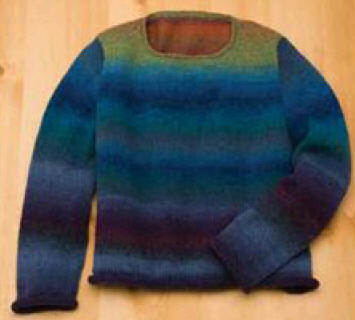
What a difference a change in yarn color can make! This piece is knit with the same basic set-in sleeve pattern except I used yarn which changes colors gradually throughout the skein of yarn.
You can use one color group, which will create a repeating stripe, or change color groups throughout the piece as I did in the sample project so the finished sweater only repeats the same colors once or twice.
This technique takes extra yarn and planning so that you line up the colors for each section of the sweater, but it creates an interesting color change rather than a repeating stripe.
Yarn used for sample shown
Knit One Crochet Too’s Paint Box (100% wool, 1.75 oz., 100 yd.),
4 balls in #04 Borealis (color A),
6 balls in #11 Nordic Sky (color B), and 2 balls in #19 Petunia (color C).
Work all pieces the same as the Basic Set-in Sleeve Sweater using the variegated skeins to achieve the color changes. You will need to begin each section at the same color section of the skein, which might mean finding where the first color you want to use begins on the skein and breaking the yarn there on each ball so each section begins with the same color.
Also, make sure that you have the yarn in the same color direction so that if, for instance, the color sequence is blue-green-gray, that you don’t start one section in the wrong order, or you might have a sleeve that is different in progression than the rest of the sweater. The key to keeping the gradual color change is to attach each new ball of yarn so that it continues the same color as the old ball for a little bit.
Begin the back, front and sleeves with A, then use two balls of B for the back and the front and one ball for each sleeve. End with as many balls of C as needed to complete each piece. You will need more for the larger sizes. (The sample was made to fit a 38" bust.) You will need to find the colors that match or most closely match from one ball to another, and attach the new ball of yarn at this section of the color sequence.
On the sample I made, the blue-gray section of each ball closely match from one ball to the next, so that is where I attached the balls. I found it easiest to wind a large ball using the balls of yarn in the sequence I wanted for each section of the sweater before beginning. So before I began the back, I broke the first ball of A so that it began at the purple section, then wound it until I was at the last bluegray section, then found the blue-gray section of B and tied those ends together.
Then I continued winding with B, attaching another ball of B, and making sure that the colors attached at the same color on the ball and were in the same order. Finally, I attached C in the same manner, so I ended up with a large ball, enough to knit the whole back of the sweater.
I repeated this for the front and each sleeve, except that the sleeve only needed colors A and B to complete them. The balls gradually changed color through the three different color schemes of the yarn. It was a bit of work at the beginning, but then I could just knit the sweater without working a color pattern.

![]()