Crocheted Steeks
My favourite way to secure a steek before cutting utilizes simple single crochet stitches. If you’ve never tried crochet, this stitch is very easy to do. (But this, of course, is coming from an author who’s about to tell you to cut your precious knitting!)
Complete instructions follow.
First, choose a crochet hook at least one or two sizes smaller than your main knitting needle, and choose a yarn that is thinner than your main knitting yarn. Be sure that this yarn highly contrasts in color so that you will be sure not to cut this crochet yarn by accident later! (And don’t worry: The yarn will not show on the public side of the garment, so any color can be used.)
Then work single crochet stitches as discussed below to join the right-hand leg, or side, of one stitch to the left-hand leg of the adjacent stitch on either side of the cutting line.
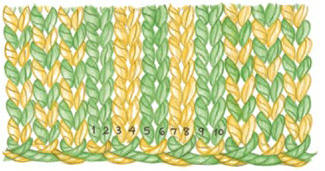
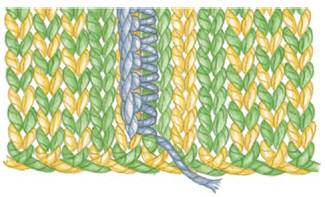
For example, let’s look at a five-stitch steek. Each leg of each stitch has been numbered for easy reference.
You will use a single crochet stitch to join legs 4 and 5 for one column of stitches and then legs 6 and 7 for the second side. Each crocheted stitch joins one leg of the center stitch and one leg of an adjacent stitch.
To secure the steek with crochet:
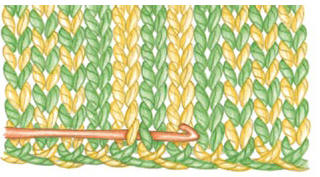
Make a slip knot, then turn your knitted piece sideways.
Insert your crochet hook from front to back to front through legs 4 and 5.
Then place the reinforcement yarn onto the hook, wrap the yarn over the hook, and draw the yarn through the two legs.
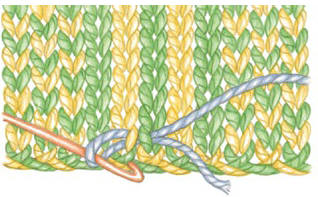
Wrap the working yarn over the hook, and draw the yarn through the loop on the hook to complete a slip stitch.
Reinforce the steek by working a single crochet stitch as follows:
Insert the crochet hook into legs 4 and 5 in the next row of knitting, wrap the yarn over the hook and pull up a loop (you’ll have two loops on the hook).
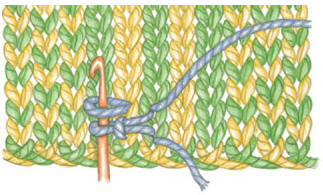
Then wrap the yarn over again and draw the yarn through both loops to make a single crochet stitch.
Repeat to the top of the steek.
For the other side of the steek:
Turn your work in the other direction and, beginning at the bind-off row, work downward to join legs 6 and 7 of each row.
You will be joining the other leg of the center stitch with one leg of the adjacent stitch.
Once both legs of the center stitch are crocheted, the stitch will be pulled in two directions, leaving horizontal ladders right down the center between the legs—you can see this in the middle of the center green stitch.
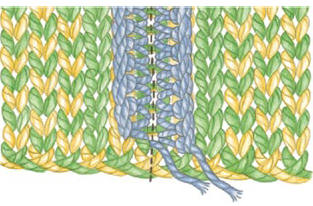
This is where the steek will eventually be cut.
color PLAY
Some knitters prefer to crochet a few slip or single crochet stitches along the cast on edge of the steek for additional security.
Sewn Steeks
If not using crochet stitches to secure the steek in your project, secure it using a sewing machine. Or, if you prefer to sew by hand, tightly hand-stitch two rows of stitching on both sides of the vertical line where the cutting will occur.
It’s a good idea to first baste along the center cutting line with a contrasting yarn to guide your sewing and cutting.
Be sure to use a highly contrasting sewing thread and very small stitches, catching each and every steek stitch—preferably more than once.
color PLAY
Garments knitted in super wash wool yarns usually require a sewn reinforcement before cutting. Although the fibber is made from animal fibber, the characteristic sticky barbs that normally make wool ideal for steeking (and for felting, for that matter) are stripped away in the chemical super wash process.

![]()